Below you will find a more “Fact and Question” oriented explanation of topic not covered (FAQ is a bit unstructed for now, on “todo” list):
How too (especially for “iBLOPPER mode”).
How to:
- Attach iBLOPPER till your S-airlock.
- If S-airlock. Use 5ml water in it.
- Goto iBLOPPER CLOUD and enter Brewname, OG, Brewsize.
- Decide on Start-out polynomial at iBLOPPER CLOUD.
- Follow the Blop pr. min (BPM) at iBLOPPER CLOUD.
- During 50-75% into fermentation (preferably way after high kreuzen has passed), take one midterm hydrometer reading. Calculate the speed of fermentation (polynomial) by the provided tool at iBLOPPER CLOUD.
- That its. Hence, this way you can foresee the final SG by an error of mean of 3 points.
Hydrometer reading of OG and “one hydrometer reading” must be precise. This give you full insight in the fermentation, by activity, temperature, and how far it have come through indicative SG estimate. All by not adding anything into the wort.
(1 Reduction in gravity, rG = OG – SG)
List of function
“iBLOPPER mode”:
- Monitor your yeast activity by motioning the CO2 blops pr. minute (BPM).
- Reports Sum blops/L”.
- Temperature is logged if a DS18b20 probe is attached.
- Based on Sum Blops/L indicative gravity estimate is given by polynomial/modelistic approach.
- Temperature control by triggering WiFi Smart Plug from either Shelly or Tasmota.
- The Logger and the CLOUD allows for 5 min interval for precise Temperature control.
“MATE mode”:
- Monitor your yeast activity by motioning the CO2 blops pr. minute (BPM).
- Reports Sum blops/L”.
- Capturing the Temperature from our eHydromter (TILT, RAPT PILL by Bluetooth signal and for iSPINDEL a WiFi Access Point is open/active). It will show the eHydrometer temperature in various overviews at iBLOPPER CLOUD.
- Capturing the Gravity from our eHydromter (TILT, RAPT PILL by Bluetooth signal and for iSPINDEL a WiFi Access Point is open/active). It will show the eHydrometer Gravity in various overviews at iBLOPPER CLOUD.
- The device hold a strong 3d antenna and hence can pick up the signals from even thick metal fermenters.
- Temperatur control by triggering WiFi Smart Plug from either Shelly or Tasmota.
- In “MATE mode” the eHydroemter temperature is also used for the temperature control system of WiFi Smart Plug.
- The Logger and the CLOUD allows for 5 min interval for precise Temperature control.
Important “take on messages” for estrimating SG by iBLOPPER MATE, e.g. “iBLOPPER mode”
- Sensor should be calibrated till “hear and see” matching count, e.g. adjust sensitivity in portal mode if needed (4 should be fine for vibration, and for sound use the pontentimeter). The “one hydrometer reading” approach somehow will solve any calibration errors, but if you wish to have a “true” and quantitative picture of BPM the calibration should be considered.
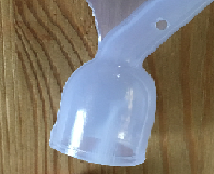
- 5 ml water in S-Airlock to get best sound blop/vibration.
- Use a fermenter there is airtight. Be a “Leak Hunter”!
- Take notice of your amounts in Liters and set this in iBLOPPER CLOUD. Same for OG.
- Take “one hydrometer reading” during brewing and recalculate the polynomial for this brew and adjust it accordingly.
- PLEASE NOTICE, this “one hydrometer reading” need to be precise, hence, double check it and read up on how to take hydrometer readings (Good hydrometer technics includes letting the sample sediment, adjusting for temperature of 20´C and foremost de-gas it before taken the reading).
- Make use of slow and controlled fermentation and/or good headspace above 20%. Especially when brewing wheat beer where foaming is an issue.
- Or, use a closed airtight blow-out system.
- Steady WiFi is needed for the logger to obtain data it needs for calculation.
- LIMITATION: iBLOPPER MATE is working by detecting vibration from the release of a bubble, hence, you will need to isolate the fermenter from vibrations and hence best to place fermenters away from washing machine, etc. I use flamingo in my cooler to isolate the vibrations. Also the cord must be isolated from any vibration especially when using a cooler.
Best settings for S-airlock, e.g. “iBLOPPER mode”
The iBLOPPER MATE needs a baseline or “start-out” polynomial for the S-airlock if using the “iBLOPPER mode” and also a few other setting/considerations needs to be done.
You can choose to enter a “Start out polynomial” based on experaince or just leave it blank until you take a midterm gravity just after high kreuzen.
- Start-out Polynomial for airtight fermenters (there’s a tendency higher headspace give higher polynomial) :
- headspace% * 0.00027 (eg. 50 * 0.00027 = 0.0135x).
- Add 25-33% for metal fermenters, see below.
- 5 ml water in airlock
- Cap/”hat” on to lower evaporation for iBLOPPER running with vibration.
- Tiny hole in airlock helps equalize and hence give best strong blop/sound for best possible detection.
- iBLOPPER MATE vibration Sensitivity: 4 best for M5 ATOM S3 LED, but please finetune to your liking.
If using none-airtight fermenters (buckets) the polynomial will be different (way higher as you loose CO2), and as such needs further considerations. The “one hydrometer reading” will tell you the speed of fermentation, but the difference between start-out polynomial and your final polynomial will be more pronounced.
Metal fermenters will have higher polynomial
It is our experience metal fermenters do have a higher polynomial than above polynomial build on plastic fermenters, and hence add 25%- 33% till above start-out polynomials for metal fermenters. Hence, if you have a metal fermenter + headspace of 50% your polynomial is around: 50 * 0.00027 *1.25 = 0.0169
I get low or high BPM -> Check alignment/Sensitivity
Ensure iBLOPPER MATE is tight till the airlock, and/or if the cables near the end of iBLOPPER MATE start to rest as a foundation on the fermetner the vibration from the bubble release can get muted. Therefore, ensure iBLOPPER is tights till airlock and free for movement. Use strong rubber bands. In general the fermenter must be places on some material to isolate from vibration sources , e.g. the compressor of a fridge or washing machine in utility room, etc., so use a towel or flamingo mat. Secondly, the sensitivity setting could be to low or high, hence, please check your sensitivity setting.
Other Airlocks?

For the other airlocks you will need to check out what works best. For the SPINDEL it seems the use of sensitivity setting of 25 works fine in combination with a coin on top to give better weight for a more precise “blop”!
Using other airlocks than the S-airlock needs an adventurous approach 🙂
What data is uploaded till BrewSpy, Brewfather and Brewersfriend if set in settings?
You can forward the “Active Brew” till either Brewfather, Brewsfriend, BrewSpy or Ubidots and it will send temperature in C and Gravity. Please use the following syntax:
- http://log.brewfather.net/stream?id=RswPzPxxxxxxxx
- http://log.brewersfriend.com/stream/:api_key
- https://brew-spy.com/api/custom/xxxxxxxxxxxxx
It will send the following:
- “Blop pr. min” is send as: BPM
- “Sum Blops/L” is send till: Sum Blops/L (only currently somming up in Ubidots).
- “Gravity” is send as: Gravity (G) as 1.xxxx.
- “Temperature” is send as: Temperature (C)
Please notice, that in “MATE mode” the logger will send the temperature and gravity of your used eHydromter whereoff it is TILT, RAPT PILL or iSPINDEL.
Diagram of M5 ATOM S3

Adding temperature probe – ds18b20?

You can add various temperature probes till iBLOPPER MATE. You can both use the header as connection or cable by “Grove – 4-pin 2mm – female wires 2.54mm“, please see diagram for details.
The temperature probe is most needed for the “iBLOPPER mode”. Especially, you will ofcouse need a temperature sensor in “iBLOPPER mode” to make use of the Temeprature Controll system 🙂
The most suited is to use the cable connection and if you use “Grove – 4-pin 2mm – female wires 2.54mm” it is the white cable for the temperature signal. We have tested with the following:
- Iduino SE042
- DFRobot Gravity – DS18B20 temperature sensor
- DS18B20 temperature sensor + wire – Iduino SE029
- DS18B29 1 meter cable + 4.7k resistor
- Ky-001 or Keyes DS18B20 Temperature Sensor Module

Using ESP 32 DevKit 1
You can also use a ESP 32 DevKit1 (is sold under various names) and either solder a MPU6050 on it or use a digtal sensor (see below). The pinout of the pins should follow the below picture and the chip should say ESP-WROOM-32.

It will ofcouse not have any LCD screen and require you to solder a bit, but it is an option if you have some lying around or like the DIY entrepreneurs approach.
The diagram for soldering or attaching the various sensors is as follows.
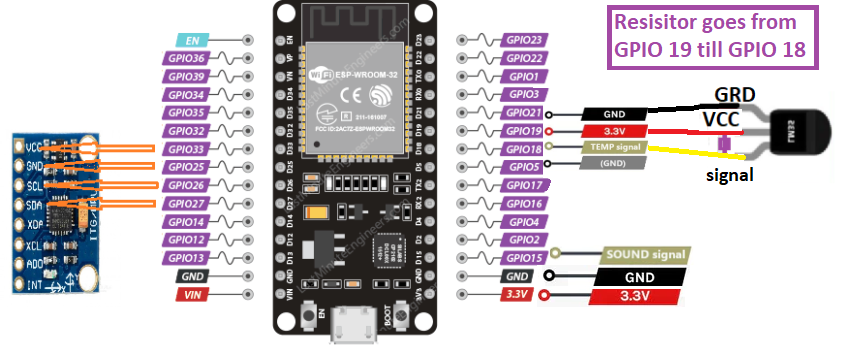
First, you need to install CP210x USB to UART Bridge VCP Drivers (https://www.silabs.com/developers/usb-to-uart-bridge-vcp-drivers) so you PC can find and see the ESP32.
If you use this ESP32 DevKit1 you should below installer instead of the one under “install/download/setup”:
iBLOPPER MATE v.M5.2 for both "M5stack S3 Atom LCD" and for "ESP32 DevKit1" (96 downloads)
Using a sound sensor for ESP32 DevKit1 ?
iBLOPPER MATE in the ESP32 version also support the use of 3-pin horizontal LM393 Sound sensor.

Building the sound sensor is easy, and you just need to add a bit of tape to steady the microphone. Secondly, add a balloon as moisture protection. If you wish to make it very durable you can add some heat-warping for cables (14-16mm radious). I have also added some tin foil to remove any interference, but not sure this really needed.
The LM393 sensor fits nicely in a S-airlock, and should be pressed whole way down. It should still allowe the pressure to get out, but else make a somehow tight “seal”.
The sensitivity of the sound sensor can be adjusted by the small potentiometer on the sensor. In general turn the potentiometer all the way down till LED light fully, and then just turn it down until light stop + a little nudge more.
In iBLOPPER CLOUD you can select the use of the inferred/sound sensor by adding “1000” as sensitivity.
Old “ESP 8266 version” ?
The former Wemos D1 Mini and NodeMCU versions is still supported, but now has it home at: