(DISCLAIMER: this software is beta software and hence treat it carefully).
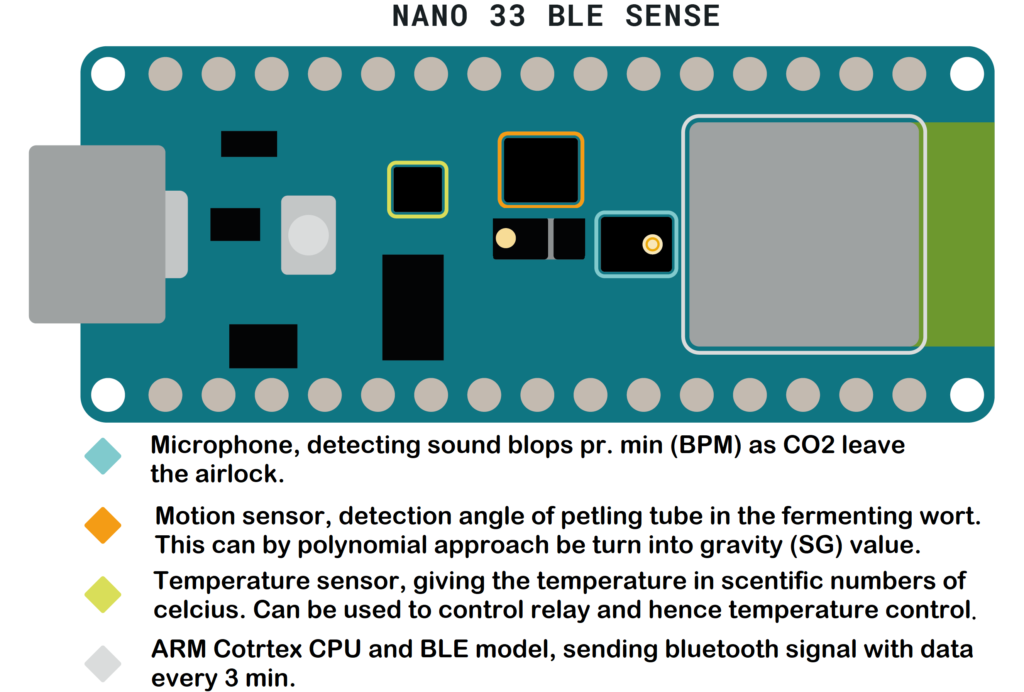
The “Bubble-Logger SPIEDEL” is an Arduino based floating hydrometer there monitor your fermentation. It use sound to detect yeast activity as a relative number though motioning the sound blops pr. minute (BPM) coming from the s-airlock. Furthermore it monitor temperature and angle turning the later into gravity. To do this it use a NANO 33 BLE Sense CPU.
Though Bluetooth connection till an ESP 32 called “Bubble Logger CONNECT” the data is display into Ubidots, Brewersfriend or Brewfather. Last, and unique, it can also control a heating-argent and cooler based on the temperature reading every 4th min. Hence, this project (build) consist of 2 Arduino devices, e.g. a floating hydrometer called “Bubble Logger SPINDEL” and a connection/controller device called “Bubble Logger CONNECT”.
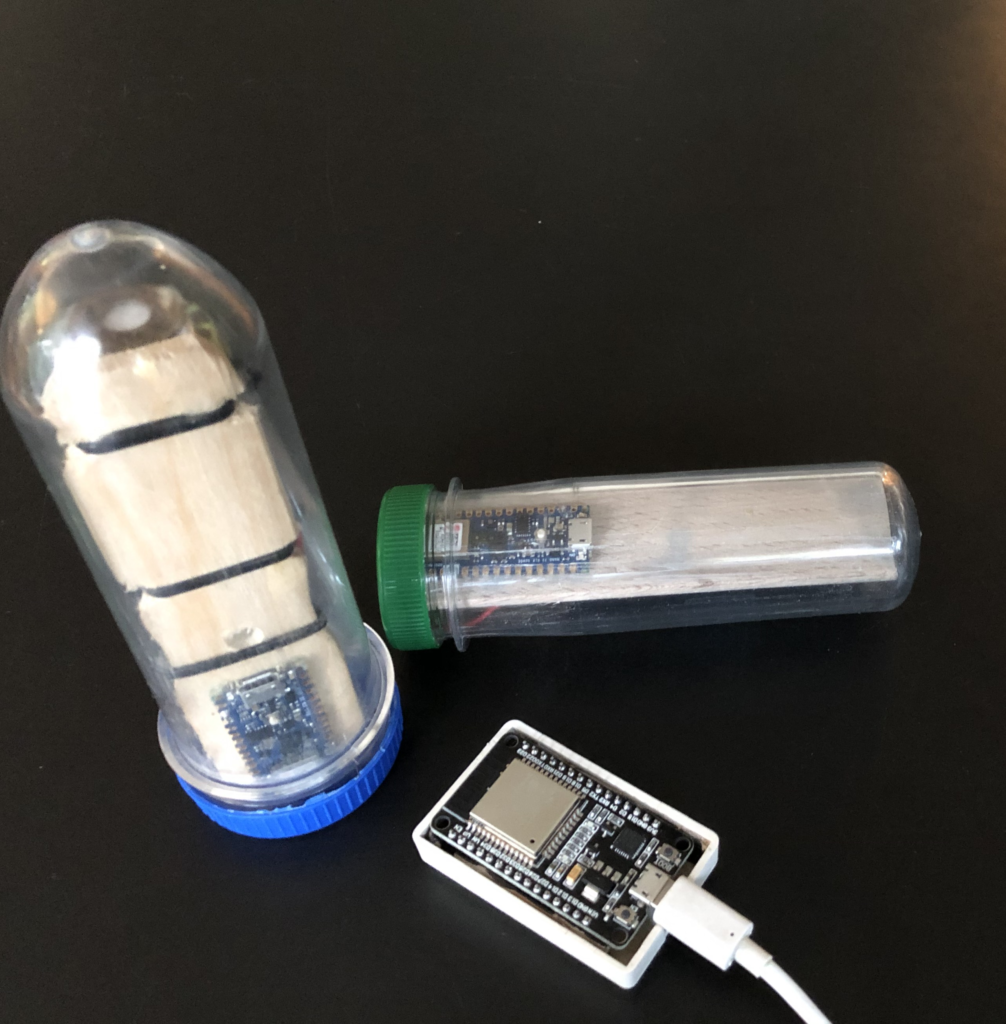
Two “Bubble Logger SPINDEL”´s. Both a XXL and XL petling can be used, Where the XXL can hold a 26650 battery and the XL fits the 18650 types. ESP32 in front as “Bubble Logger CONNECT” 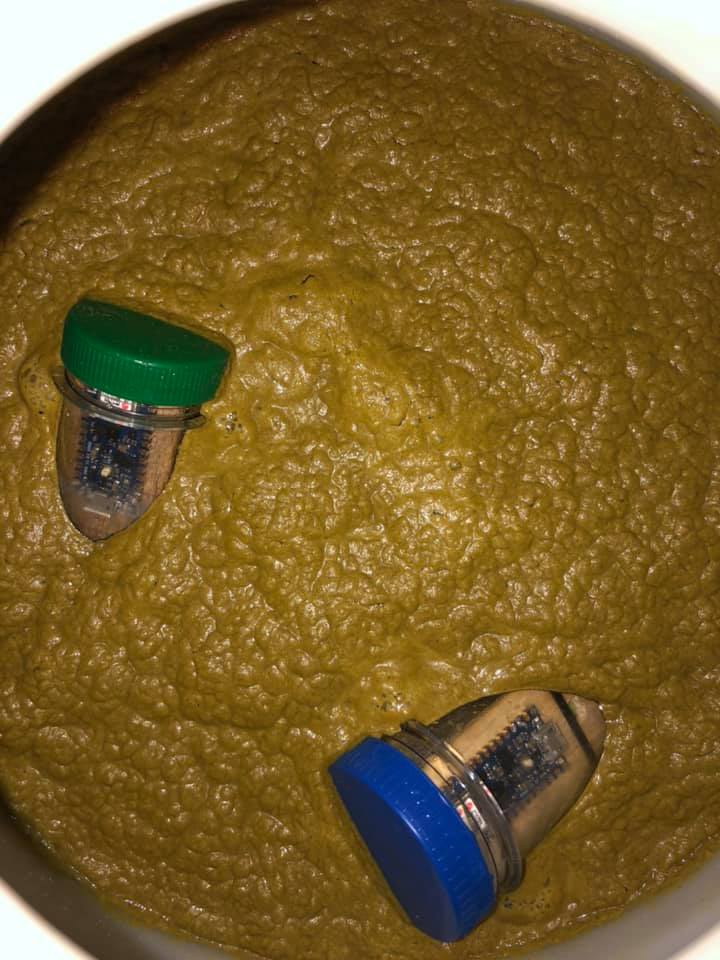
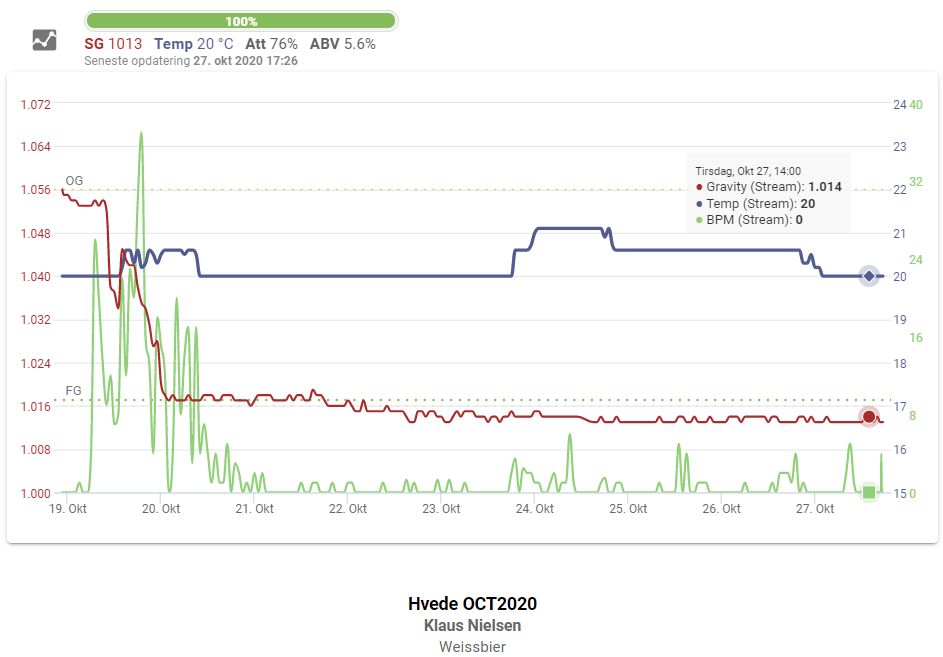
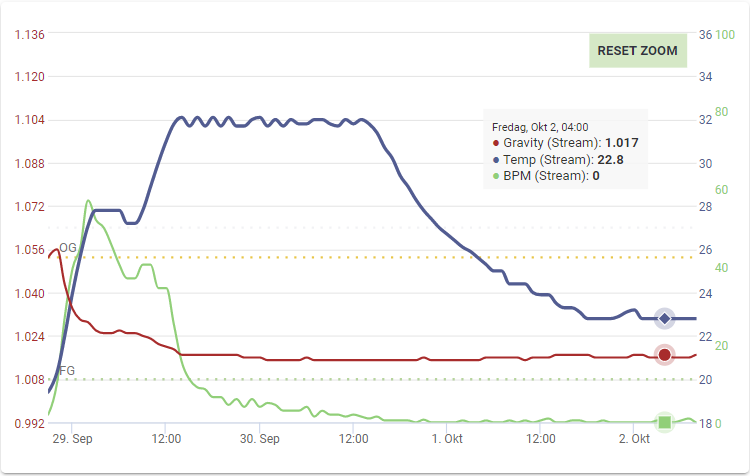
“Bubble Logger SPINDEL”´s by fermenting Voss Kveik yeast. the angle of petling in wort can be used to determine gravity as angle change during fermenting.
Hence, this project measure/do:
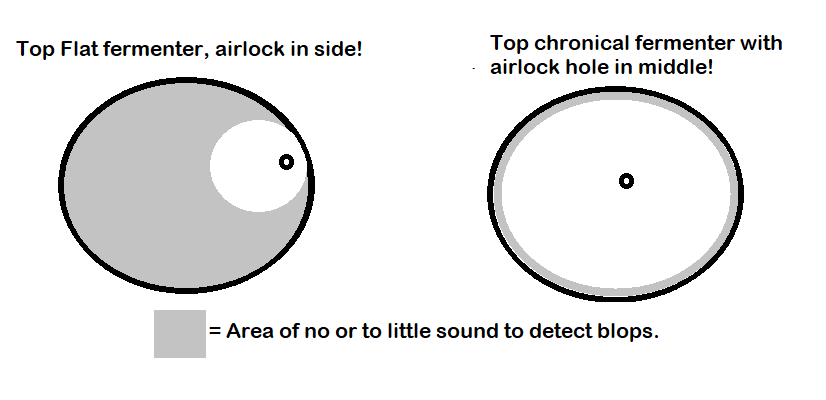
- Measure the relative activity of the yeast as CO2 escape the fermenter by a digital sound detector giving sound blops pr. min (BPM). By relative means a none-exact indicative value of activity there for the current brew is meaningful, but none comparable from brew till brew (see more later). Best results is obtained if a hard surface material is used and the fermenter got a chronical shape in the top with bug hole in the middle. You should have around 4-5ml water in S-airlock for best blop.
- Measure angle of floating hydrometer/petling directly in the fermenting wort. As the angle change over fermentation/time this change can be expressed as Gravity by polynomial/modellistic approach from the reported angle.
- Measure temperature in wort and hence control a 2-channel Relay to control a heat and cool source based on the temperature reading every 4th min, hence, slow-working heating actor should be used (I used a 30W reptile heating mat).
- Hence, Send all data to the cloud in a easy way (BPM, Angle, Temperature, Gravity and color of hydrometer in use). The software sends to Ubidtos, Brewfather and Brewersfreind if you enter the url or Token in captive portal mode.
Fermeters to use?
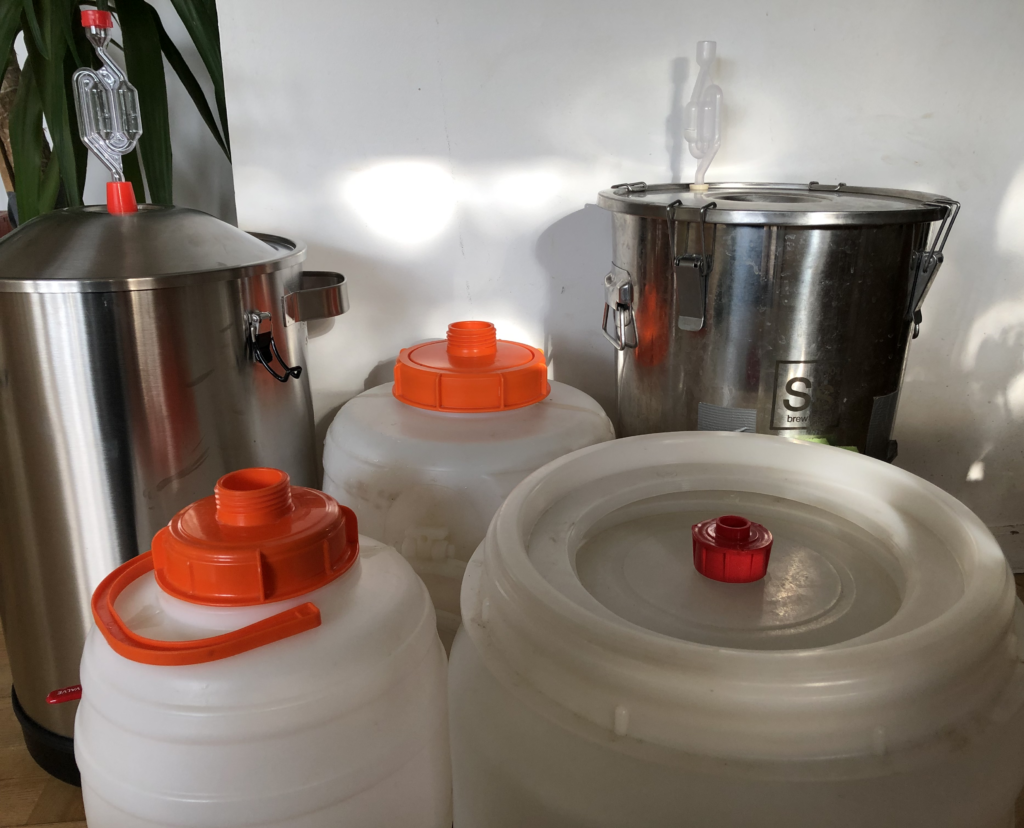
Before you start building you should consider what fermenter to use, as not all fermenters can be used for the sound blops detection. At the very least the fermenter needs to be airtight, and as such this set a decent level and leave the buckets out.
What we need is a fermenter there makes a good and strong sound chamber where the sound can ressonace and be picked up by the digital sound sensor of BLE 33 Sense. The test I done makes my conclude, the fermenter holding best sound chamber characteristics is fermenters with hard material (e.g. metal is best), and best type are also those there hold a chronical top design with airlock in middle. But as the BPM is a relative measurement of the activity it doesn’t as such need to be exact in BPM number and many type of fermenters can be used to give a indication and relative number for the yeast activity expressed as BPM.
I have tested a few, Spiedles 10 and 20 L hard plastic, Mangrove Jack 25L metal tank, SS Brewtech 25L metal tank, and also a barrel of 30L and while the later was bad, most seen to work decently taken above “fermenter design” into account.
Further to the choice of fermenter, then the amount of water in S-airlock do decide the height of the blop and hence I use between 4-5ml to get best sound blop.
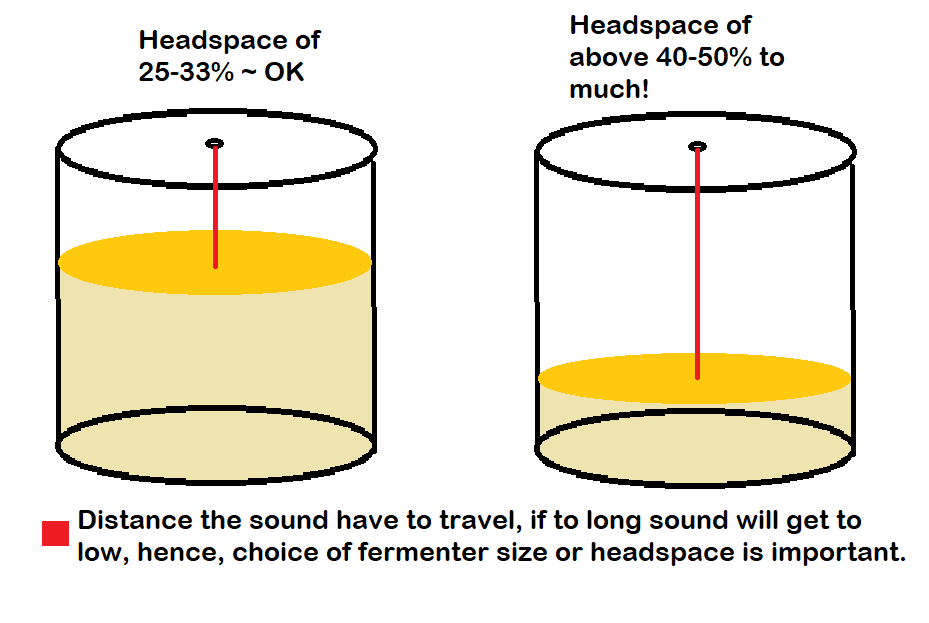
Also, the headspace should be considered, as to less or to high headspace will impact on the sound area, or if headspace is very high the sound get to dampen coz to long length before reaching the SPINDEL. So the amount/headspace giving the length from S-airlock till “Bubble Logger SPINDEL” will impact on blops detected. To little length giving to little sound area (or cone of sound), while to long might give to less(=low) sound for “Bubble Logger SPINDEL” to pick up the sound. Hence, I strive towards 20-25% headspace.
All above do means we can have a relative activity value expressed as BPM, but as we often will only detect 25, 50 or 75% blops compared to “hear and see”, this becomes an relative number for the current brew to see the activity in its lag, high (kreuzen), mid and decline phase.
Building a “Bubble Logger SPINDEL”
To build a “Bubble Logger SPINDEL” the main component is a “Arduino BLE 33 Sense” there hold all the sensors we need. A battery holder, battery charger and a LiFePO4 battery is also needed besides a few cords and glue. Only 4 soldering points need to be done and all is assembled on some wood. The choice of wood is based on beaning conveniently avaivble everywhere, but also it hold some good properties for muting sound inside the petling.
The choice of LiFePO4 is mainly it provide a very precise voltage not exceeding 3.6v and the BLE 33 Sense dies if you add more. Hence, LiFePO4 can provide voltage directly and no LIDO is then needed keeping build/cost down. WARNING: Do not use any other batteries as they will destroy the BLE Sense (hence no use of Lithum ion Polymer there even state 3.7v at full charge hold 4.2v). It should be noted the LiFePO4 batteries are seen as more safe and less likely to court fire plus environmental a better solution.
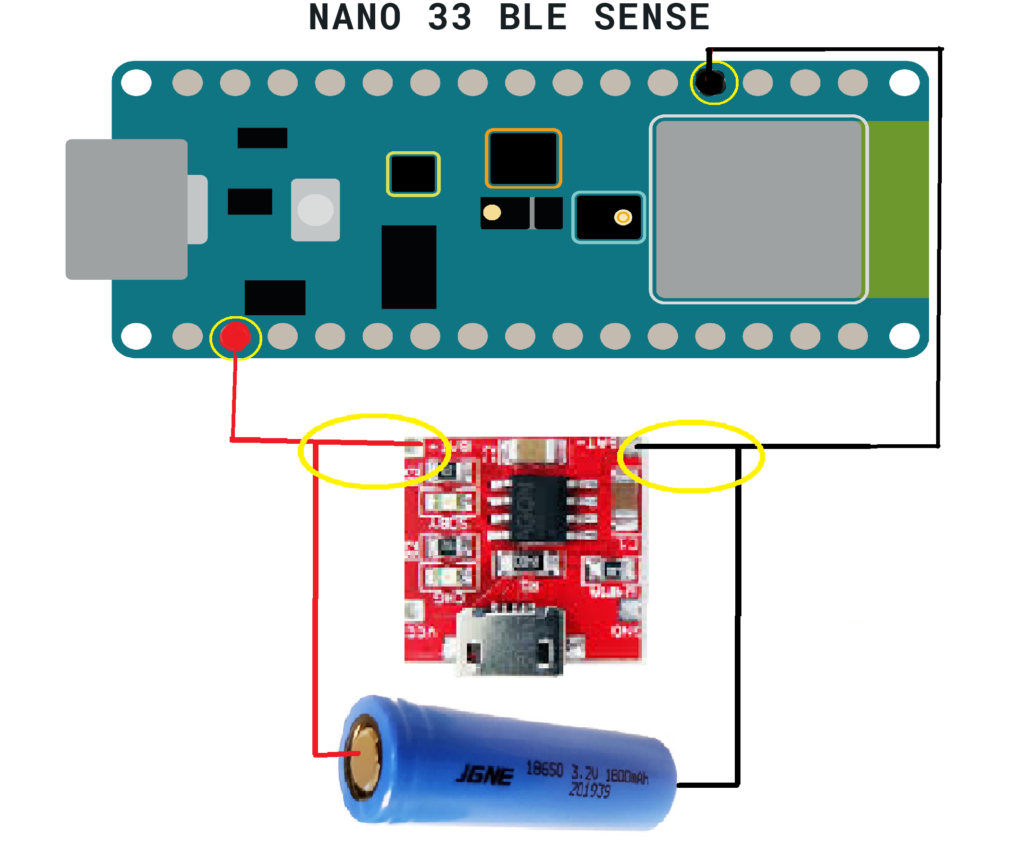
Needed parts (Links for mainly European sellers) and Diagram (Check your charger, should be TP5000)
- Arduino BLE 33 Sense (LINK).
- LiFePO4 battery charger, TP 5000 (LINK).
- LiFePO4 battery 1800mah or 26650 mah (No Lithum ion Polymer, they give to much voltage) (LINK).
- Cord, wood (2.8cm x 12.3cm), glue.
- XL or XXL Petling (LINK).
- Battery holder 18650 (optional, and not needed especially not for 26650 ) (LINK).
A bigger version around a XXL petling and 26650 LiFePO4 battery is prefferable. This version is heavier (dobble weight) and also have a more afloat position in the wort, and hence, hold higher stability and position in the wort giving better BPM and angle detection. This version is not so much afecceted by foaming.
Building a “Bubble Logger SPINDEL”
To build the “Bubble Logger SPINDEL” you need to solder 4 points. Beware the antenna on BLE 33 Sense is very fragile and any of the very small metal connectors at top can easily break off. The BLE sense is placed on top and solder steady with 2 cord with needlepoints. Further, I add some glue. The charger is glued to the wood on Battery holder side and connections between battery and BLE 33 Sense is soldered together to the + and – of the chager.
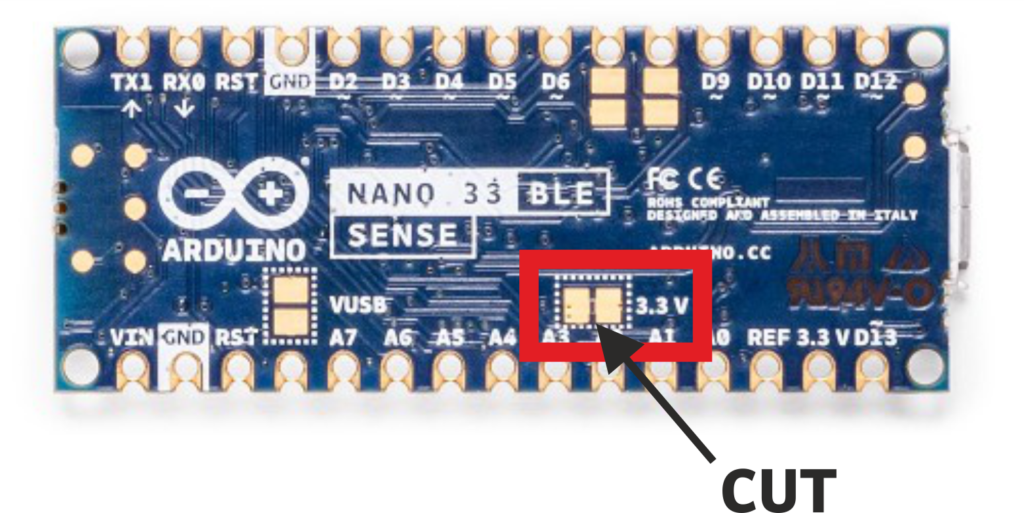
1). Before building the “Bubble Logger SPINDEL” the 3.3v connector must be cut to enhance battery life with a factor of 3. 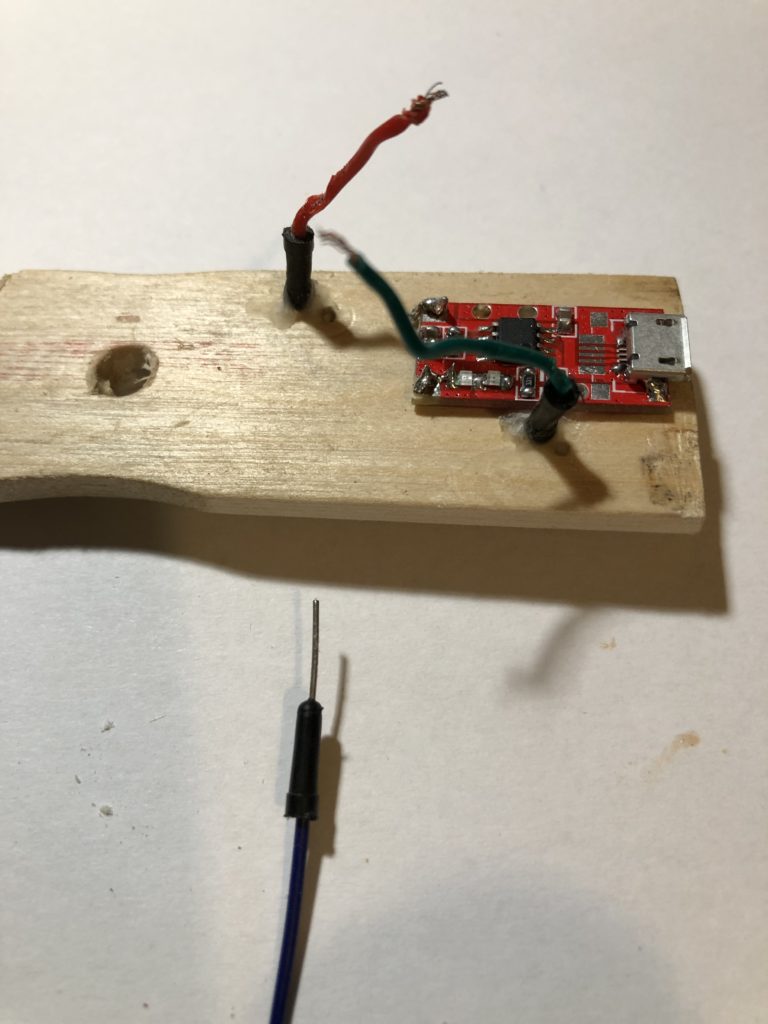
2). The BLE 33 sense is steadied to the woord by 2 needlepoint cords with drilled holes. Charger is glued. 
3). The Needlepoints seen from top side. To ensure BLE 33 Sense is attached a bit glue is added in each corner too. Beware the small connectors on the antenna is fragile, and hence, the BLE 33 Sense must be placed a bit away from top of wood. 
4). Battery holder is attached and cords from battery and BLE 33 Sense is connected til Battery charger (ensure positive side of battery is downwards for best balance).. 
5). Placed in petling, depending on angle in water add some weight to get close till 25 degrees. 
6). Final 
XXL Petling version: A version for XXL Petling and 26650 battery. with JTS connector and charger outside! 
XXL Petling version: A version for XXL Petling and 26650 battery, where the battery is just taped on. 
XXL Petling version: A version for XXL Petling and 26650 battery. 
XXL Petling version: To ensure the wood is kept in place an hence to secure the components do not shift positions (e.g. angle is not changed) during handling and charging I have added a screw and bolt to tighten it in place. the battery got som filt to steady/tighten it at bottom, but the most important place to secure the stabilt/tight position is at top as here we attach charger and sametime have the IMU measuring the angle.
Some would say this build miss a on/off switch, and if I ever get to make a PCB, I might include it, but with a 1800mah battery the “Bubble Logger SPINDEL” should last 25-40 days (1st “Lay to rest test” = 37 days) even with the current posting of every 4th minute. To be nice to your batteries please try charge it each month. You can check if the SPINDEL is alive as it will blinks green every 4th, hence, lay it on table and watch it for blinking green every 4th minute.
Please also notice, when 3.3v is cut, you cannot power the BLE 33 Sense by USB power, and hence, to upload it needs both battery power and ofcouse to be connected though USB till BLE 33 sense, see more below.
Last, but not least, then the sled or wood must be very tight in the petling to ensure the angle is not changed by movement of the components/sled especially critical when attaching the charger.
Download and install bin file for “Bubble Logger SPINDEL”
After building your “Bubble Logger SPINDEL” you will need to install the bin-file on it. For this you need a Widows machine and make use of Command prompt. You need to download the various color based zip-files till “your user” directory folder.
- Go to “Devices” (e.g. use win10 search and write “devices”).
- Ensure BLE 33 is module is connected till USB and got power from battery by ensure battery is installed too (e.g. notice you need to attach USB till BLE 33 Sense and not the charger 🙂
- Double tab the BLE sense white button twice fast. This send it into bootloader mode (yellow light starts to blink). BLE 33 Sense should come up under “Ports” in Devices. Notice this USB port number!
- Open Command prompt again by write “cmd” in win10 search.
- In “cmd”: Go into downloaded folder by “CD COLOR_spindel_v1.0” (if you downloaded install files in “your user” directory else go to specific location you downloaded till).
- In “cmd” run after changing the port number, version number and full file name/COLOR:
bossac.exe -d --port=COM10 -U -i -e -w COLOR_spindel_v2.0.bin -R
Zip-files (each containing one bin-file with color-separation and the bossac.exe file):
In the “Bubble Logger CONNECT” you can adjust the Color of SPINDEL in use, by ~ 1=Black, 2=Green, 3=Yellow, 4=White, 5=Pink, 6=Blue . Currently I guess BLUE or GREEN is sufficient, but the other colors can be added on request.
Building a “Bubble Logger CONNECT”
Building a “Bubble Logger CONNECT” including relay support is rather easy and do not need any soldering as such. It do need good knowledge for mains and hence all high voltage work should be accomplished by a skilled worker in this area.
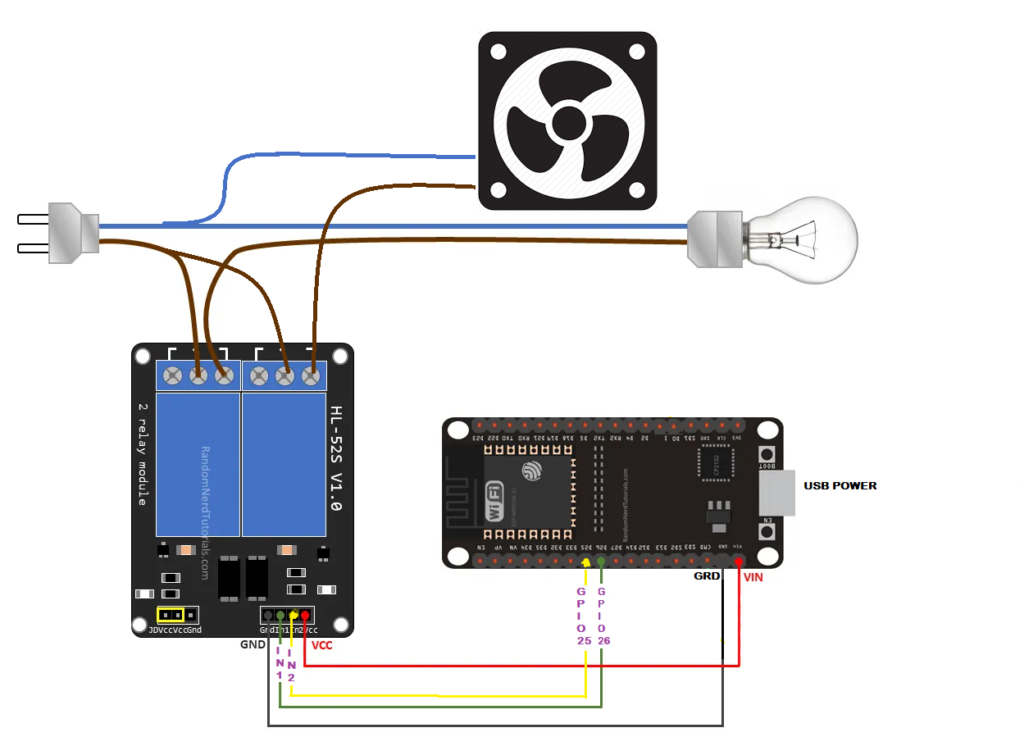
Needed parts and Pin/pinout
It needs an ESP32 devkit and a min. 500mA charger, 1.0 A is better. The 2-channel relay is optinal.
- heating: RELAY0_PIN 26 –> int1 on relay
- cooling: RELAY1_PIN 25 –> int2 on relay
- 5v by ESP32 WIN
- Ground
Relay and warning = beta software
This software is in beta and even I have included all the safety I can think off please treat it carefully. The Relay do turn off if no “Bubble Logger SPIEDEL” is found, and the heating part of the relay do turn off before each data treatment to secure the heating is off if it goes down. The “Bubble Logger CONNECT” do not support temperatures below 2´C or over 60´C and will turn relay of if set outside this range. If the wifi is unstable, and hence if the logger lose wifi it will restart to secure a new connection, hence, there is build in a behavior of restarting. If you experience any melt-down where the logger get stuck in either heating or cooling mode, please, let me know! If entering “0” in portal mode under settemp, all temperature controlling is disabled.
Stability
To ensure a stabile Bubble Logger CONNECT, it is important to use a charger giving at least 1.0 A as the ESP32 use up till 250mA when handling WiFi and as the relay is triggered at the same time this use up till 100mA too, hence, minum charger is 500mA, but to hold some overhead look for a 1.0 A charger. If the charger do not give sufficent power, it will freze.
Installing/Burn “Bubble Logger CONNECT”
Download below file containing esptool.exe and 4 other files and extract in “your user” folder:
- Install CP210x USB to UART Bridge VCP Drivers, if not already done. If you played with Arduino IDE and EPS32 before you must likely done this before.
- Ensure ESP32 is pugged into USB.
- Go to “Devices” (e.g. use win10 search and write “devices”).
- Under “Ports” in Devices. Notice this USB port number for “CP210x USB to UART”!
- Open Command prompt again by write “cmd” in win10 search.
- In “cmd”: Go into downloaded folder, e.g. “BL_CONNECT_v1.0” (if you downloaded install files in “your user” directory else go to specific location you downloaded till).
- In “cmd” run after changing the port number:
esptool.exe --chip esp32 --port COM4 --baud 921600 --before default_reset --after hard_reset write_flash -z --flash_mode dio --flash_freq 80m --flash_size detect 0xe000 boot_app0.bin 0x1000 bootloader_dio_80m.bin 0x10000 BL_CONNECT.ino.bin 0x8000 BL_CONNECT.ino.partitions.bin
If something goes wrong you can erase everything by: esptool.exe -p COM4 -b 115200 erase_flash
If updating to new build and/or making use of an ESP32 from earlier project, ensure to erase everthing as else you will get instabillity isuses.
“Bubble Logger CONNECT” ver2.1_FINAL_ (-–>Needs SPINDEL ver2.x<--) (961 downloads)Operate/setup “Bubble Logger CONNECT”
The Bubble Logger got a captive portal mode and hence you log on just as it was a Wifi access point. If the login page do not automatically come up, go to: 192.168.4.1
It will for 180 seconds go into this “Captive Portal” at power on (or after any failures as lost connection or lost power) where all setting can be done (E.g hence, set Brew Name, SSID+Password, wich “Bubble Logger SPIEDEL” color in use, start Temperature, (License, currently not needed), offset for temperature/gravity and setting URL of either Brewfather URL/Ubidots Token/Brewersfriend). It light blue when in “Captive Portal” mode (and also blink blue for 5 sec when sending/treating data).
Hence,
- Connect till the “Bubble Logger CONNECT” SoftAP though either you mobile phone or laptop by Wifi. After connect till access point the Bubble-logger url for the configuration page is: 192.168.4.1
- Set the various parameters accordingly (Currently, you need to set SSID+Password every time you enter “Captive Portal” mode, so you need to set SSID+password even you just changed one parameter. A bug we are working on).
- If you later on wish to change for instance temperature, pull power for 2 sec, and go into portal mode agian and change the temperature (remember to set SSID+password again too).
- If entering “0” in portal mode under settemp, all temperature controlling is disabled.

Secondly, the Bubble-Logger also got a web server you can follow all data on during brewing, to access this on you need to find the IP either in you routing table or some Network sniffer program. The Web server is on: 192.168.1.xxx:8080 (hence please notice the port is 8080).
You will ofcouse need a Ubidots STEM account and hence the TOKEN (see under API credentials), and for Brewfather you need to enable “Custom Stream” and inset this associated URL into Bubble-logger. I am not good a Brewersfriend, but this is similarly done as Brewfather.
What data is send?
The following data is send till Brewfather and Brewersfriend (please notice I am not good at Brwersfriend and hence might be issues/error):
- “Blop pr. min” is send as: BPM
- “Angle” is send as: Pressure (PSI)
- “Gravity” is send as: Gravity (G)
- “Temperature” is send as: Temperature (C)
- “Color” is send as a comment and can be seen under devices.
(Please notice I do not and do not intend to support other than metric numbers. 3rd worlds countries has to add up and follow the scientific rules.)
For Ubidots the above is also send (Angle is send as: Angle), but also the power-state of relay is send, where the following coding is used.
- 0 = Relay awaiting.
- 1 = Relay cooling.
- 2 = Relay heating.
- 3 = Relay turned of as something wrong ~ No “Bubble Logger SPINDEL”?
- 4 = Relay turned of as SetTemp is outside supported range of 2-60´C.
[paypal-donation purpose=”Bubble Logger Project” reference=” Bubble Logger Project”]
Airlocks is different – Hence try a few for getting best sound blop/Equaling pressure?/Assuring no evaporation?
As there is difference between airlocks, difference in the molding, in the plastic and hence how the bubbles is formed then please try a few different s-airlocks to see wich one might hold the best sound “blop”.
Further to the choice of S-airlock (and design of fermenter), then the amount of water in S-airlock do decide the height of the blop and hence I use between 4-5ml to get best sound blop.
If the pressure of the sound bust is not able to get out the sound get mudded/muted, and hence either keep the “hat” loose on the S-arilock, and/or drill a small hole on the top side of the S-airlock.
Same-wise, you should ensure the evaporations is low as the change of water in the S-airlock will change the bubbling rate a bit. Hence, the “hat” need to be on.
Other Factor’s affecting the “relative” sound “blop”
Besides the already mention fermentor design and the amount in S-airlock and then the amount/headspace giving the length from S-airlock till “Bubble Logger SPINDEL” will impact on blops detected. To little length giving to little sound aea (or cone of sound), while to long might give to less(=low) sound for “Bubble Logger SPINDEL” to pick up the sound. Hence, I strive towards 25% headspace.
The yeast choice and grain bill might also give variation in foaming amount, and to much foam will likely damping the sound and hence the BPM detection..
Hence, there are reason the BPM is only a relative measument, and as such in this setup should NOT be used to compare from brew to brew, but merely a relative number for the current brew to see the activity in its lag, high (kreuzen), mid and declice phase. And hence together wiht the Angle/Gravity it give a fuller picture of the fermentation even a releative number.
In all, the BPM will never be 100% in detection and if we get higher than 50% in general I think it is fine as a relative measument.
Blowout system
I have initially tested this setup also using a blow-out system and if the right amount of water is used and hence generating a good blop, this setup can work. Hence, something to test further. It is likely very much influence by the length of tube, diameter size and softness of blow-out tube. How straight the tube is ruining is likely also important hence ensure no bends.
Calibrating for Gravity or just use plain angle?
To use the angle and turn this into a gravity measurement you need to follow the same procedure as for Ispindel, and if you are here at this homepage you most likely have seen or read about Ispindel. Hence, please follow these links.
- http://www.ispindel.de/docs/README_en.html
- http://www.ispindel.de/docs/Calibration_en.html
- http://www.ispindel.de/tools/calibration/calibration.htm
But is should be notected that the Angle as itself in most case is a very good tool to detect if the fermentation is final and this together with BPM is all you need. You anyway need to make at least 2 measurement of SG by real hydrometer to ensure final SG.
The bubble Logger CONNECT support 1st or 2nd and 3rd degree polynomial as the exsample below:
(875.63 + (9.33*tilt) - (0.212*tilt*tilt) + (0.00175*tilt*tilt*tilt))-(0.1*(temp-20))

The Polynomial can max. hold 200 ciffers, if longer shorten. As the temperature can impact on the angle (e.g when cold chrashing), a temperature function of, SG – (TemperatureCorrectionFactor X (Temperature – 20 °C)) is build in as marked by bold in above. I use a TemperatureCorrectionFactor of 0.1, hence, going from 20C till 10C would impoact nearly one 1 SG if not accounted for. This is build in from version 2.1.
Please else notice the “Bubble Logger CONNECT” contains an “Gravity offset” function, so if your “Bubble Logger SPINDEL” is geneal 2-3 SG off, you can fine-tune by this function.
Important “take on messages”
- 4-5ml in S-Airlock to get best sound Blop.
- Use a fermenter there is airtight. Be a “Leak Hunter”!
- Recalculate the polynomial based on your “Bubble Logger SPIEDEL”.
- Make use of slow and controlled fermentation and/or good headspace.
- Steady WiFi is needed for the logger to obtain data it needs for calculation and for posting.